Download your
free camera test chart PDF.
Fill in your email in the form below and get directly access to the camera test chart, as well as the checkerboard pattern chart. Scroll to the section “Lenses’’ and find the files under number 3 and 4.
How to calibrate a computer vision camera?
Camera calibration is the process of estimating the intrinsic and extrinsic parameters of a camera. The intrinsic parameters describe the internal characteristics of the camera and lens, such as focal length, optical center, and distortion. The extrinsic parameters describe the camera's position and orientation in the world coordinate system. While it depends on the
computer vision software that you are using, the key steps to calibrate a computer vision camera are:
- Download our free calibration target: we offer a camera test chart as well as a checkerboard pattern through the form above.
- Capture images from the target, make sure the lighting conditions are optimal; make sure there is enough contrast on the calibration pattern. Reduce glare and shadows as much as possible.
- Detect the calibration target features in the images: This can be done automatically using computer vision algorithms that identify the corners or other distinctive points on the target.
- Estimate the camera parameters: With the 3D world coordinates and their corresponding 2D image coordinates, you can use optimization techniques like least-squares to estimate the camera's intrinsic and extrinsic parameters.
- Evaluate the calibration accuracy: Compute the re-projection error, which is the distance between the observed 2D feature points and the projected 3D points using the estimated parameters. The lower the re-projection error, the more accurate the calibration.
Common tools and libraries used for camera calibration include
OpenCV and
Zebra Aurora Vision. These provide functions to perform the calibration process and handle the underlying mathematics.
After calibration, the estimated parameters can be used to correct lens distortion, recover 3D information from 2D images, and enable precise camera-robot coordination for applications like robotic vision and augmented reality.
What is a camera test chart?
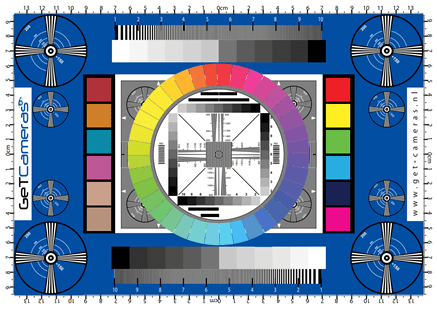
Our high quality camera calibration board is a specialized image designed to evaluate various aspects of your computer vision camera's performance. The chart contains a variety of patterns, lines, and color swatches that allow you to assess factors such as:
Sharpness and Resolution: The chart helps you determine the maximum level of detail your camera can capture, and can help to put your lens in to focus.
Color Accuracy: By checking the color patches, you can identify any issues with your camera's color reproduction, preventing dull or inaccurate colors in your pictures. Do note that when printing the calibration chart, the colors can be slightly different due to the printer settings.
White Balance: The neutral gray and color patches allow you to fine-tune your camera's white balance settings for accurate color rendition.
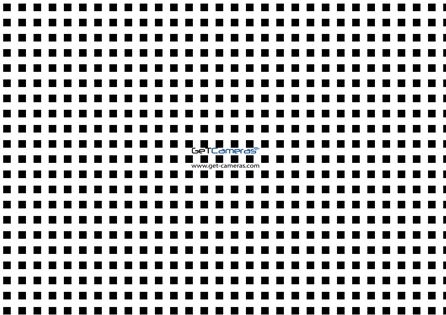
For checking the distortion of your lens we recommend to use our checkerboard pattern chart.
What is a checkerboard pattern chart?

Through the form above you can also download the
GeT Cameras checkerboard pattern chart for free. The checkerboard pattern acts is the perfect tool to diagnose lens distortion. By examining how these straight lines render in the final image, you can identify common distortions like barrel distortion, which makes straight lines appear curved outwards, or pincushion distortion, which bends them inwards.
Identifying these distortions allows you to make informed decisions about lens choice and potentially correcting this in post-processing software for a more accurate representation of the image.
Not all lenses are created equal when it comes to distortion. Our
C-mount lenses boasts significantly lower distortion compared to the M12-mount offerings in our portfolio. This advantage stems from the increased size of the glass elements within C-mount lenses.
Our
telecentric lenses reign supreme in minimizing distortion. This is because they utilize parallel light rays. These rays hit the lens at near-identical angles, significantly reducing the bending that creates image warping in standard lenses. While not perfect, they offer a dramatic improvement. They also are the only lens type that give a fixed magnification in the working distance.
Do you need any help selecting the most suitable
lens for your computer vision application?
Please reach out, our vision experts always like to think along.
Download your free camera calibration chart
To get started, simply fill in the form above to access your free camera calibration chart. This high-resolution file can be printed out and used to test and calibrate your camera whenever you need to ensure optimal performance.
In addition to the free camera test chart we offer a wide selection of
machine vision cameras with both
USB3 and
GigE interface to meet your computer vision requirements. Our industrial camera portfolio includes USB2, USB3, GigE, 2.5GigE, 5GigE, 10GigE and CoaXPress camera technology with highspeed image-sensor up to 860fps and high-resolution global-shutter sensors up to 151MP.
If you have any questions or need further assistance, don't hesitate to reach out to our machine vision experts.

 Through the form above you can also download the GeT Cameras checkerboard pattern chart for free. The checkerboard pattern acts is the perfect tool to diagnose lens distortion. By examining how these straight lines render in the final image, you can identify common distortions like barrel distortion, which makes straight lines appear curved outwards, or pincushion distortion, which bends them inwards.